
Deploying FileMaker Server on Ubuntu Linux with Let's Encrypt SSL
Updated for Claris FileMaker Server 2023.3 & Ubuntu 22
While I am used to deploying Claris FileMaker Server on Windows Server, I recently needed to do a deployment on linux for the first time. I created this guide as practical reference as I went about the process. I hope you find it useful.
Ubuntu Linux
As of FileMaker Server 2023.3.x deployment on linux is supported on Ubuntu 22.xx LTS (Long Term Support) Server.
FileMaker Server operating system requirements - all versions
Using Ubuntu provides several advantages:
- Cost savings on Windows Server licenses
- Better Performance
- Faster deployment, easier automation and maintenance
Cloud hosting provider
You can use any cloud hosting provider that provides Ubuntu Linux instances including Amazon Web Services, I have had good experiences with the following providers and prefer them as their pricing and management interfaces are better:
Both have multiple geographical locations and support creating a cloud defined network firewall which we will come back to later in this guide.
Generate SSH key
While you can connect to the Linux server using username and password, It's strongly recommended to use public key authentication for security.

On MacOS, open Terminal and type the following using your email address:
ssh-keygen -t ed25519 -C "username@domain.com"You will be prompted to enter a path and filename for the key or accept the default, you can press enter when prompted for a password to skip it, two files will be created at the following path by default:
- ~/.ssh/id_ed25519 (private key)
- ~/.ssh/id_ed25519.pub (public key)
cat ~/.ssh/id_ed25519.pub
ssh-ed25519 AAAC3NzaC11ZDI1NTE5AAAAIAIeaLEXiTPi5X7+MIT1peMIChRYpsHy 2IOUs+186 username@domain.com
Will display the contents of your public key so you can copy it the clipboard.
To generate an ssh key pair on Windows, you can use putty. This article has more information.
Deploy server instance
On your cloud hosting provider deploy the new server instance and select the size the of the instance based on the number of your users and server workload:
The minimum is 4xCPU cores and 8xGB RAM, fast SSD storage is highly recommended. Select Ubuntu 20.xx LTS as operating system.
During deployment, you will be asked to paste your ssh public key created earlier.
Once the server is running and assigned an IP, assign a subdomain to the server IP via your DNS provider or domain registrar.
In this guide we will use fms.domain.com as an example.
Login to the new server
To login using your private key generated earlier, type the following in Terminal with the correct path and filename for your private key:
# Login as root
ssh root@fms.domain.com -i ~/.ssh/id_ed25519
Installing FileMaker Server
Get the latest FileMaker Server for Ubuntu download url from your Electronic Software Download Page provided by Claris.
Official Documentation for reference
# Update Ubuntu, run this multiple times until there are no more updates
apt update && apt upgrade

# Check & confirm Ubunto version
lsb_release -a

# Install needed packages
apt install wget
apt install unzip
apt install at

# Install FileMaker Server
cd ~/
mkdir fminstaller
cd fminstaller

# Download and unzip
wget https://downloads.claris.com/esd/fms_20.3.1.31_Ubuntu22_amd64.zip
unzip fms_20.3.1.31_Ubuntu22_amd64.zip

# Identify installation filename
ls filemaker*.deb

# Start installation
sudo apt install ./fms_20.3.1.31_Ubuntu22_amd64.deb

# Follow prompts during installation for license, type and admin credentials

# Check & confirm FileMaker Server & Nginx are running
ps -A | grep fm
ps -A | grep nginx
At this point you should have FileMaker Server up and running.
Let's Encrypt SSL & Certbot
Official Certbot Documentation for reference
Next we will install certbot to generate a Let's Encrypt SSL certificate and setup auto renew as LE certificates expire every 90 days.
https://github.com/mhtawfiq/FileMaker-LetsEncrypt-Ubuntu-Nginx
Follow the instructions at my GitHub repository above to install certbot and download the necessary scripts to generate the SSL certificate for the first time and manage automatic renewal.
The scripts will allow you set up a specific time of the day when FileMaker Server can be restarted after a certificate renewal.
Check certbot timers and confirm they are running:
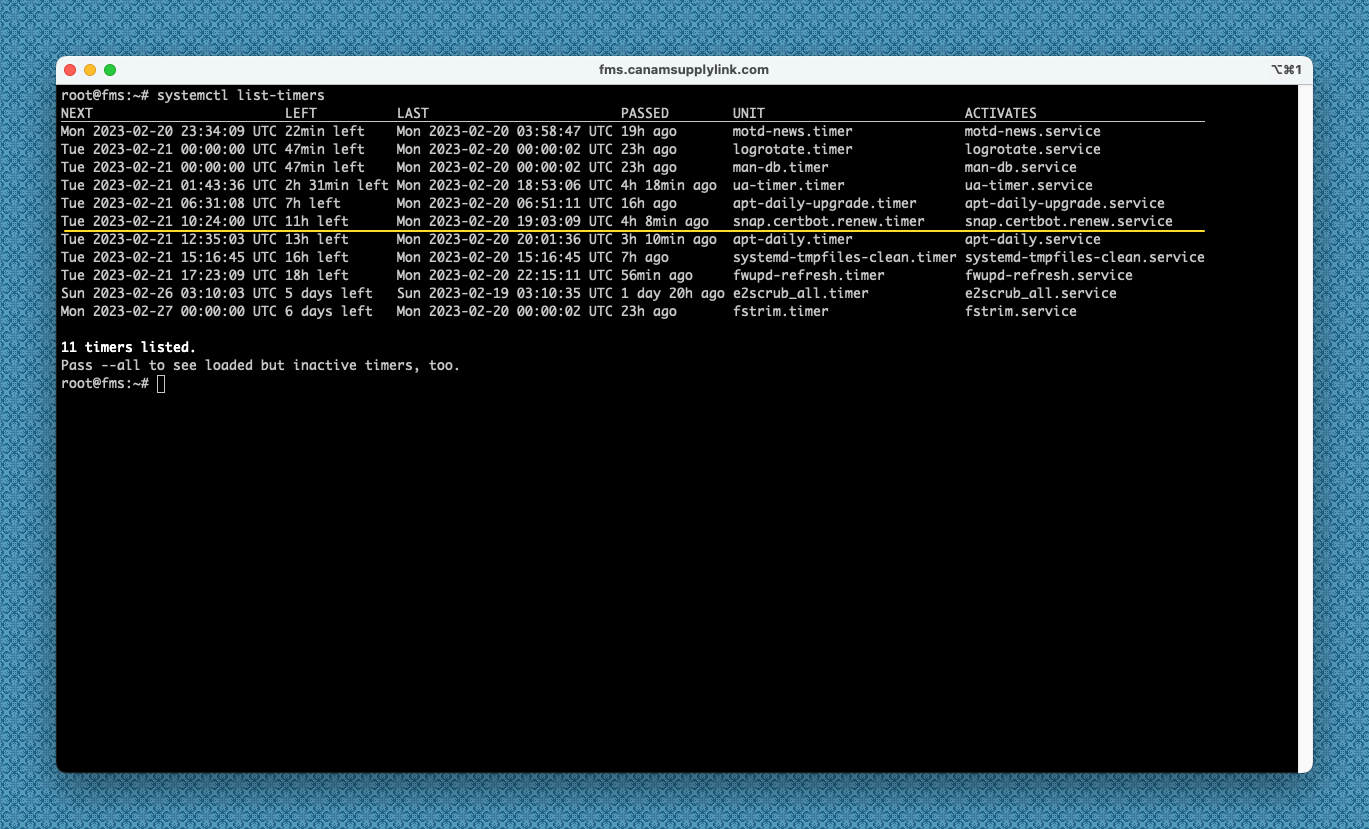
The systemctl timers installed by certbot by default check twice a day at a random time if the certificate needs to be renewed, only if the certificate is renewed will it run pre and post hooks for additional processing.
Using certbot post hooks insures that once the certificate is renewed by the timers, FileMaker Server will only restart at the time scheduled in renew-cert-at.sh to avoid disruption of access to users at an undesired time.
Data & Plugins
The easiest way to transfer databases and files is using an sftp client like Forklift or FileZilla to connect to the server and transfer files.
# Databases Path
/opt/FileMaker/FileMaker Server/Data/Databases/

# Database Engine Plugins Path
/opt/FileMaker/FileMaker Server/Database Server/Extensions/

# Custom Web Publishing Plugins Path
/opt/FileMaker/FileMaker Server/Web Publishing/publishing-engine/cwpc/Plugins/

# FileMaker Data API Plugins Path
/opt/FileMaker/FileMaker Server/Web Publishing/publishing-engine/wip/Plugins/
Restarting FileMaker Server services
Commands below show how to restart all or some of FileMaker Server services when needed after a plugin installation for example.
# Start & stop all services
service fmshelper stop
service fmshelper start

# Restart Scripting Engine
fmsadmin restart fmse

# Restart Web Publishing Engine
fmsadmin restart wpe

# Restart Data API
fmsadmin restart fmdapi
FileMaker Server Admin Console
You should now be able to access and login to FileMaker Server Admin Console with SSL encryption at:
https://fms.domain.com/admin-console
Firewall
The final step is to secure the server with firewall rules only allowing necessary access, I prefer to do this using the hosting provider cloud defined network firewall. This offloads some load from the server as the firewall acts at the network level before reaching the server.
This also allows you to apply the same firewall rules to multiple servers (development, staging, production) easily.
Hetzner, Vultr and AWS all support defining cloud network firewall rules, follow the links to documentation on how to set it up for each provider.
What is important adding the rules to allow only necessary access:
Ports used by FileMaker Server
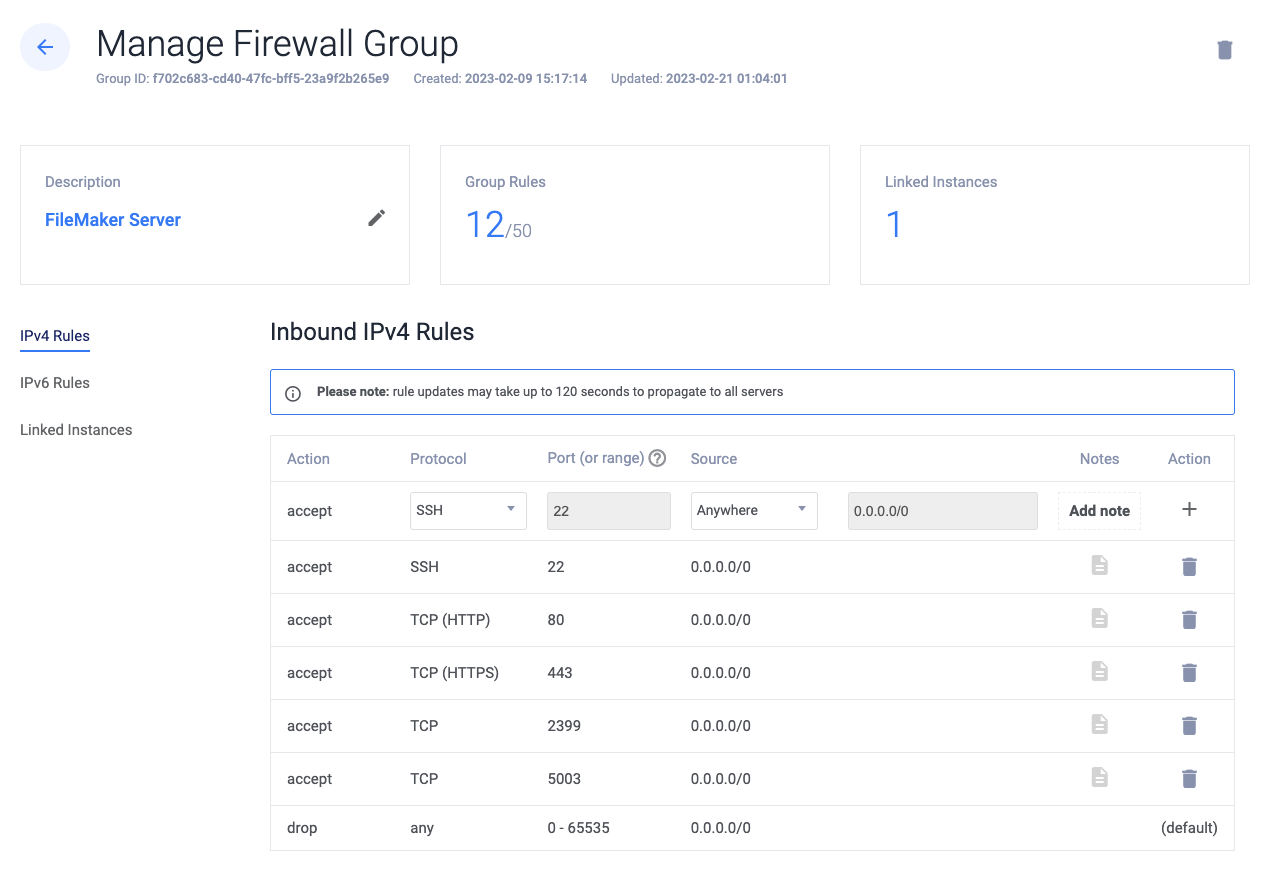
FileMaker Server Firewall needed rules overview:
accept TCP 22   (SSH) 0.0.0.0/0
accept TCP 80   (HTTP) 0.0.0.0/0
accept TCP 443  (HTTPS) 443 0.0.0.0/0
accept TCP 2399 (ODBC) 0.0.0.0/0
accept TCP 5003 (FileMaker Clients) 0.0.0.0/0
If you would still like to use a software firewall on the server itself, ufw comes installed by default on Ubuntu, you can set it up as follows:
# Check Status
sudo ufw status

# Add rules
sudo ufw allow 22
sudo ufw allow 80
sudo ufw allow 443
sudo ufw allow 2399
sudo ufw allow 5003

# Enable Firewall
sudo ufw enable

# Disable Firewall
sudo ufw disable
Updating FileMaker Server
Insure you have a proper backup and stop then:
# Stop FileMaker Server service
service fmshelper stop

# Update Ubuntu, run this multiple times until there are no more updates
apt update && apt upgrade
Then repeat the installation process again, the installer will update necessary dependencies and update FileMaker Server to the new version.